 |
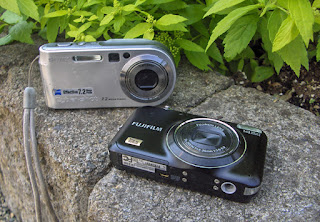
| Two inexpensive older digital camera |
Choosing a camera: Unless
you are planning to sell your photographs, expensive camera models
with interchangeable lenses and many options are not necessary to create
pleasing flower portraits. Many low cost digital cameras now offer a
"macro" setting - which is basically a built in "close up" lens. You
will be able to get as close as 4 to 6 inches away from the flower and
still have a reasonably sharp image for capturing details such as
personality spots or a cooperative ladybug.
A simple tripod is
highly advised for achieving the sharpest images and will help to increase the
quality of your photographs because automatic settings that "adjust" for
hand shake can only go so far to compensate. Quality used tripods
can be found in second hand stores for very little money, so do not be
alarmed at the price of that fancy new one, but do make sure the removable
"pad" that is used to attach the camera is included.
Before you snap that shutter...
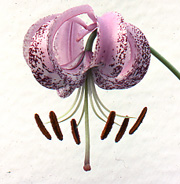 |
| Lilium lankongense |
#1 - What is your background?
We are so used to our surroundings, that we generally only see the
beauty of the lily and our mind conveniently blocks out the view of the
wheelbarrow, filled with prunings and sitting 10 feet away. With the
camera on the tripod, look critically through the lens - ignoring the
subject flower for a moment - and check to see what else is about to
recorded. If you have a simple background of shrubs, lawn, treeline or
hedge, the focus should be on your subject with the other objects
secondary. Many times when doing closeup work, you can "fuzz out" the
offending background, reducing it to just an abstract of colors or use
textured watercolor paper as a backdrop like this single downfacing flower of
Lilium lankongense.
A pleasing vista is still preferred for the best compositions - and by
including a reference point, your photos will become more interesting.
Note the difference between the two images of this stand of
Lilium pardalinum?
The right hand photograph is more enjoyable with the scoop shovel and
old stump because you can see just how tall the stems are growing in the
garden.
[Most photos will enlarge if you click on them. -dg]
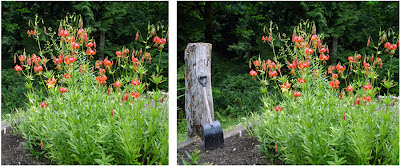 |
| Lilium pardalinum growing in a garden in Port Orchard, WA |
 |
| Same 'Mrs. R.O. Backhouse' - cloudy day. |
 |
| See the pollen on it's tummy? |
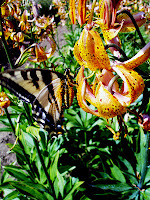
#2 - Check the weather.
Overcast days will tend to give a blue cast to white flowers, but the
natural daylight is also softer and more evenly spread than in bright sun, and there are no
sharp shadows. In general, just after sunrise and before sunset are the
best times for photographing warm colors, plus the petal textures will
be more evident. Bright, sunny days are not the best times to
photograph your garden. See
the butterfly (with its pollen covered tummy) on this close up of a
Martagon lily? It had rained all night and the butterflies did not come
out until the sun did, so the lighting was not the best and the image
not as crisp. The
next photo (same variety of lily) was taken on an overcast day and
since there were no shadows, the color is not brassy. Can't tell the
difference? Compare the leaves on both photos if the flowers look the
same to you. Should a bright sunny day be your only option then ask
someone to hold a translucent white "photography" umbrella or a rigid sheet
of greenhouse plastic to cast even light on your subject. Frame your
photograph and be careful that your own shadow doesn't fall on the
ground... and give away your secret!
#3 - Wind is not your friend.
On a pleasant day wind generally comes in gusts, so with a simple point
and shoot camera, hold down the shutter button part way to set the
focus (use a tripod if you can't hold still) and wait until the wind has
quieted down. The beauty of digital is that you can keep repeating the
shot until you have a winner. In the old days of slide film, it became
rather expensive to toss out blurry slides when they came back from the
photo lab.
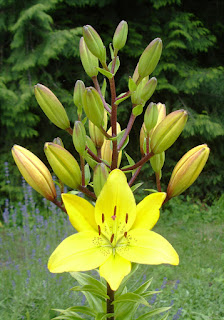 |
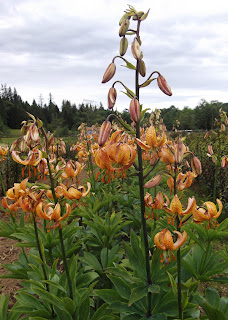
| Unlabeled Asiatic lily. |
#4 - Composition. Try not to put your subject "dead center" in the frame - unless you are archiving a record of flowers from your garden for hybridizing
purposes - and thus need an image of relative flower shape and growth
habit. The most pleasing shots have a bit of background showing and
with the flowers and stems at an angle. There are many art books that
give instructions on how to paint a pleasing canvas and the same
composition techniques apply to photography.
This yellow lily is well
balanced, but the open flower is out of focus; it would have been better
to change the angle of the camera to put both the buds and the flowers
the same distance from the lens, which would not have changed the look
of the background trees or the meadow grasses.
#5 - Last check. Are
there brown leaves or stems, bird droppings on the leaves, weeds, or
your shoes showing in the camera lens frame? Move them - or you - before you
press the shutter. Are there pollen grains on the petals that make the
flower look less "fresh"? A soft artist paintbrush on a dry day can be
used to gently brush off pollen if it hasn't already stained the petals
from overhead watering and rainfall. Do you like what is framed on the
camera? Would it be better from another angle? Move the tripod
slightly to the side to make the photograph more interesting.
And... the one item that most people forget... record the name of
the flower that you have just photographed! If in a public garden, many of
the flowers, trees and shrubs will be labeled. In a friend's garden,
ask while you are shooting because similar varieties can be hard to distinguish from one another in photographs.
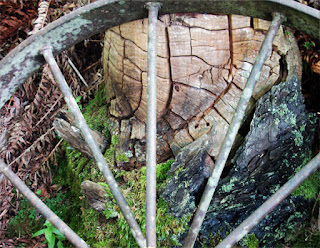 |
| Interesting decomposing stump behind this old iron wheel. |
Have fun and don't
be too critical of yourself - or you'll end up buying an abundance of
photography equipment trying to make things perfect. Remember that some
of the best photos also show a few "defects" - brambles growing around
the front end of an old tractor or a single red tulip in a bed of pink
ones (keeping the oddball out of the very middle of the shot for a more pleasing composition). Even the dead fern
fronds behind this old wagon wheel can add interest. Whatever
should suddenly catch your eye may have the possibility for a good
photo, so keep your camera charged and don't be afraid to experiment.
What to do with your best photos? Print, mat, and enter them into the local county or
state fair to see what happens. Judges are usually pretty open with
suggestions on how to improve your photography skills and can be a good
resource.
[Except for the image of L. lankongense, all the photographs in this article were taken with one of the two cameras shown at the top of this page. -Dianna]


No comments:
Post a Comment